Mar 30, 2010

Mar 23, 2010

Color Study


must mention that this is a study piece, so the palette is heavily referenced.
The painting below is a beautiful artwork, but i cant remember who did it :P

My ref

Colored Speedy


Colored one of my early sketches

Mar 22, 2010

:(


:((((((((((((((

Mar 21, 2010

Blocking II : Legion Part IV

Alright, so amidst the process of blocking and creating form, you will move on to unify and blend the surface of your sculpt.

Here's an example of the surface of an early blocked sculpture.


Now here are some of the tools i'll be using to refine the form and the surface of the sculpture.
Note that these are called "rake tools". Due to the raking action across the surface of your sculpture.
On the left is "loop heads" and on the right is "teethed/rake heads"


Teethed rakes are good to really scrape the contour lines in to the surface, similar to how your would sketch with a fine pencil the lines that make up contour.


loop rakes are good to smooth out surfaces and also create recesses on the surface.


So these are just a few of the tools i use, stay tuned for more in the future!
And a little update on the Legion sculpture.

Types of Clay

Ok, before we start blocking our sculpture, it;s good to inform you the types of clay/sculpting medium available for you.

They are mainly divided into these groups

  • Water Based
  • Oil Based
  • Oven Bake able
  • Epoxy
  • Wax
Here's some description and pictures for each category

Water Based


Affectionately known as WED clay, these are cheap air dry clay that is used dominantly for large sculptures. Popular in the monster making and FX industry.

Oil Based


Notable brands are Chavant Plasteline. Oil based clay do not dry up, and can be soften with heat and hardened to a degree with a freeze spray.

Come mainly as Chavant Regular ( Sulphur Based ) and Chavant NSP ( Non Sulphur Plasteline )

Used dominantly in the fine art industry for its flexibility and control.

Oven Bake able


Notable brands are Sculpey and Fimo. Popular amongst amateur craftsmen and professionals. This clay hardens after baked. allowing you to sand, paint and finish your work. Due to this bake able feature, this clay is rather expensive RM 65 - RM 75 per box

Sculpey regular is a beige+cream colored clay which is softer than it's cousin, the firmer grey colored Sculpey Firm.

Epoxy


I briefly showed the usage of epoxy putties in the previous armature post. But putty can be used to sculpt as well. Milliput is a popular brand of high end epoxies, but you can get cheaper versions of epoxy from your local hardware store.

Used dominantly by customizers and miniature artists. Epoxy dries after its two part are kneaded and is capable of holding good amount of fine detail.

Wax


Wax is the most professional form of sculpting material, it comes in various densities and brands. A notable brand is FUSE Wax. Dominantly used in high end figurine and statuette sculptures by industry professionals. Wax is the most versatile sculpting material known, allowing the artist to create the most minute details.

It is also the most challenging to pick up, as it's workflow is very unique. Pliable with heat, artists use heat guns, Lamps and also wax pens (picture above).

Honestly, most of my knowledge of these materials come from reading forums and research, i have never worked with wax and chavant personally. So if any of you would like to try FUSE, WED, etc , do tell me. We could definitely learn together!

As for me, my favourite clay so far is 50:50 mix of Sculpey Regular and Sculpey Firm. I will mix the two until it's a smooth blend and store them in plastic tupperwares to keep them from becoming crumbly.


Happy Sculpting!

Blocking : Legion Part III

Alright, in this part we're going to learn about clay blocking. Blocking is the first stage where the initial form is sketched onto the sculpture.

We will be aiming to nail all the proportion issues here, width length, roundness, angles, cuts, etc.

So instead of doing this with only our eyes as judgment, we will use a tool called measuring calipers.


Now these are professional calipers, i have no idea where to get them in Malaysia, but we can opt for other substitutes,

like using and old geometry set compass,


The usage of the compass is simple, based on your 1:1 reference sheet, make a measurement with your caliper, and compare it with your sculpt.


Repeat this throughout you sculpting process to check proportional issues, Calipers can be used to compare limb lengths as well ( left arm/right arm) to ensure a balanced anatomy.


So, continue measuring and blocking, start by building up representational "bridges" of clay to define the main mass before filling up the gaps.


If you noticed, i build up my sculptures using small bits of clay, these are booger sized bits that i press on to my sculpt to gradually build up size.

This is a popular method for veteran traditional sculptors. Stan Winston was taught to practice this method. The benefits is that you have maximum control of how your form grows, allowing a gradual and controlled creation of form.

Happy Sculpting!

Mar 19, 2010

Quick Mechas


Alot of 'finished' concepts at work. It's nice to spit something up.

Mar 15, 2010

Research : Legion Part I

New sculpture commission, Legion from Mass Effect 2

Here's my research.


.

I'm quite exited about this one, always wanted to add LEDs to my works.
and a game character aswell, this isgonnabeswell.

Building your Armature : Legion Part II

Building your Armature


Alright, so you have your ortographics and your research done, it's time to move on with building an armature for your sculpture.

We will be making it out of different gauge wires, and also epoxy putty.


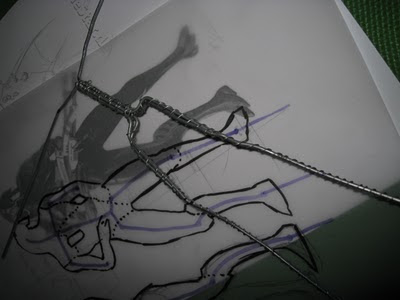
Here i have drawn out the placement of the armature within the mass of the sculpture.
The lines in red represent the wires that go through the sculpture. Note the excess wires that trail from the feet, those wires will be used to attach the sculpture to the base.


Bend the wires according to your diagram.


Using a finer gauge wire, wrap the parts together tightly, this will hold the pieces of bent metal together aswell enabling the clay to grip on to the armature.


Continue wiring your armature, be mindful of your reference and make sure everything is proportionate.


Here you can see me attaching the early armature on to a mock base. This base is a block of wood with holes drilled into it. bend the excess wires to fasten the armature to the base.
With a little bit of duct tape, you can secure the excess wires. bear in mind that this is a mock base, and we will transfer the final sculpt to a proper base.

So make sure you don't glue the armature down.


Here we have the base armature, note the arms a cut shorter, as i plan to sculpt the individually prior to attaching.


With that aside, here's some epoxy putty i am using to really secure the joints of the armature. especially where the wires meet.

This is how your knead your epoxy,


It comes in to parts, A and B.


Swirl them together so they mix well.


Keep swirling and pressing until you get an even putty. You have about 2 hours working time (Pot Life) before it becomes rock hard.


Apply putty to where the wires meet and end. this will greatly improve your sculpture's structure.


Here is the finished armature, Note the wire trailing down form the head. I am planning to include an LED light for the eye. So you should include early wiring on the armature itself. that way it will be invisible when i add clay.

Leave your armature to cure overnight, and then you can begin sculpting!

till then, cheers!