Alright, so you have your ortographics and your research done, it's time to move on with building an armature for your sculpture.
We will be making it out of different gauge wires, and also epoxy putty.

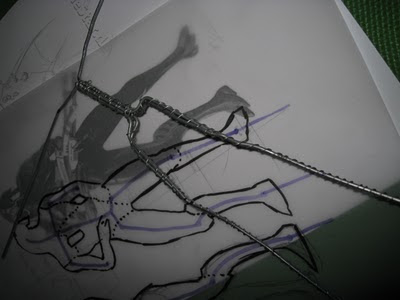
Here i have drawn out the placement of the armature within the mass of the sculpture.
The lines in red represent the wires that go through the sculpture. Note the excess wires that trail from the feet, those wires will be used to attach the sculpture to the base.

Bend the wires according to your diagram.


Using a finer gauge wire, wrap the parts together tightly, this will hold the pieces of bent metal together aswell enabling the clay to grip on to the armature.


Continue wiring your armature, be mindful of your reference and make sure everything is proportionate.


Here you can see me attaching the early armature on to a mock base. This base is a block of wood with holes drilled into it. bend the excess wires to fasten the armature to the base.
With a little bit of duct tape, you can secure the excess wires. bear in mind that this is a mock base, and we will transfer the final sculpt to a proper base.
So make sure you don't glue the armature down.


Here we have the base armature, note the arms a cut shorter, as i plan to sculpt the individually prior to attaching.

With that aside, here's some epoxy putty i am using to really secure the joints of the armature. especially where the wires meet.
This is how your knead your epoxy,

It comes in to parts, A and B.

Swirl them together so they mix well.

Keep swirling and pressing until you get an even putty. You have about 2 hours working time (Pot Life) before it becomes rock hard.

Apply putty to where the wires meet and end. this will greatly improve your sculpture's structure.


Here is the finished armature, Note the wire trailing down form the head. I am planning to include an LED light for the eye. So you should include early wiring on the armature itself. that way it will be invisible when i add clay.
Leave your armature to cure overnight, and then you can begin sculpting!
till then, cheers!

this is the most comprehensive armature tutorial ive come across.
ReplyDeleteyou have no idea how many time me and giam redid our armatures -_- so this is awesome
thanks for posting this up jarold! looking forward to more sculpting tutorials!!!
hey hey thanx!
ReplyDeletenext time i watch to show tutorial for telescopic armatures, -its super professional wan.