
I have to say, i'm comfortable with sculpting and everything. but when it come to casting and working with silicone, it always rattles my nerves.
I'm fairly new with 2 part mould making, so everything i'm posting up now is un-tried before by me. Haha, so far i've just read articles and watched videos on mould making, but never really attempted a full scale one like this before.
Just to get an idea of how expensive this process cost, i'm using two tins of silicone rubber for just ONE half of the mold. that means per tin is RM 100, total rubber cost for casting this up is RM 400!
sooo, i really really hope i don't screw up! :D
Ok, so here's the plan, i will be building a base out of plasticine and foam scrap, the plasticine should line up right at the median of the entire sculpture. The hands were easy, a full body cast like this is more complicated.

I used a plastic base, and sketched out the are of the mould.

I bought ten packets of school plasticine. (wish i bought 20)

As you can see, i've drawn the median along the perimeter of the sculpture.

I realized that i didn't have enough clay, so i had to substitute with some foam scrap and the base of the sculpture.

After a foam base is laid out, i start bulking on plasticine based on the line drawn.

continue bulking, here you can see a large blue foam chunk.

The entire sculpture is blocked in with plasticine.

using a sculpture tool, i start leveling the surface, especially where the sculpture and plasticine meet.

Keep leveling at keep it as neat as possible.


from here on i started using my finger to smooth out the surface, and then with a soapy brush to get into all the corners.

plasticine is smoothed and ready for the next step.


I added some resin vents using wooden chopsticks cut to length.

a wire is used as an air vent.

vents were added on the ears as well.

I build the walls similar to the ones on the hands. added gutters and keys similar to previous post.

here i'm marking the silicone level, the ideal is that the entire sculpture should be covered with atleast two thirds of an inch of silicone.

Spraying some silicone release agent.

Here is my RM 100 per tin silicone, i got them from Multifilla. it comes with it's catalyst to make it cure.

prepare a mixing bowl and mixing stick.

Stir the contents inside first before pouring into you mixing bowl.

pouring into my mixing bowl.


I used 50% of my silicone tin, so use 50% of your catalyst as well.

stir well, but not too fast, we don't want too many bubbles.

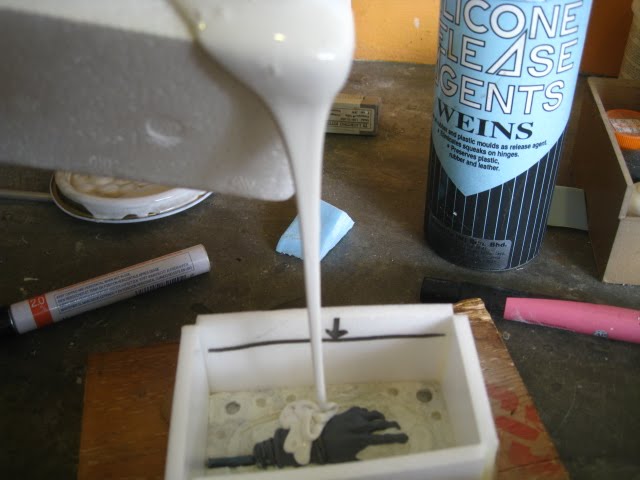
Pour your silicone slowly into you prep mould.

The idea is to pour rather high up, about 30cm high, so that you get a real thin flow of silicone into your prep mould. this will reduce bubles.

Also, pour from the highest point, and let the silicone slowly slide it's way down.
Here is the main body mould with silicone poured into it. sorry i couldn't get anymore inbetween pics, my camera battery was dieing :)
noticed i put in small chunks of cured silicone, this was from an old silicone mould that had already served it's purpose. I cut it up into flat nuggets and laid them together to save on silicone.

Silicone curing in the hand moulds.

Have to wait 24 hours for it to cure,
wish me luck!
No comments:
Post a Comment